Android Kotlin Fundamentals는 codelab에 올라와있는 강의를 한글로 번역한 내용입니다.
Codelabs for Android Kotlin Fundamentals | Training Courses
Content and code samples on this page are subject to the licenses described in the Content License. Java is a registered trademark of Oracle and/or its affiliates. Last updated 2020-09-14 UTC.
developer.android.com
코드는 github를 참고해주세요.

07-3 GridLayout with RecyclerView
1. Layouts and LayoutManager
이전 단계에서 fragment_sleep_tracker.xml에 RecyclerView를 추가 했을 때 어떤 커스터마이징도 없이 LinearLayoutManger를 추가했다. 아래 코드는 데이터를 세로 목록으로 표시한다
app:layoutManager="androidx.recyclerview.widget.LinearLayoutManager"
LinearLayoutManager는 RecyclerView의 가장 일반적이고 간단한 레이아웃 매니저이며 자식 뷰의 가로 및 세로 배치를 모두 지원한다. 예를 들어 LinearLayoutManager를 사용하여 사용자가 가로로 스크롤 하는 이미지 캐로셀을 생성할 수 있다
GridLayout
또 다른 일반적인 사용 사례는 GridLayout을 사용하여 사용자에게 많은 데이터를 표시해야 하는 경우이다. RecyclerView 용 GridLayout은 아래와 같이 데이터를 스크롤 가능한 그리드로 배치한다.
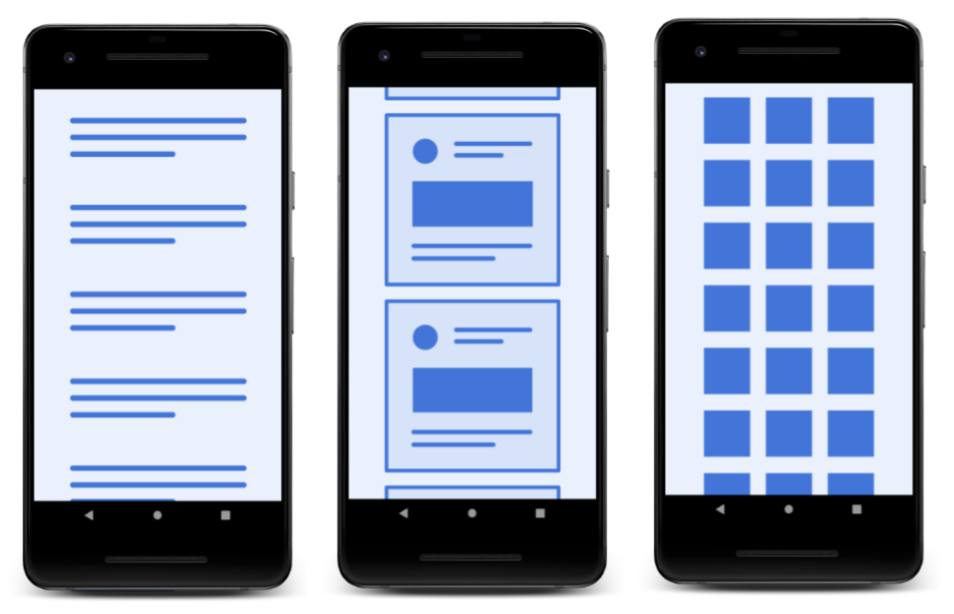
디자인 관점에서 GridLayout은 사진 갤러리 앱 내의 리스트와 같이 아이콘 또는 이미지로 표시될 수 있는 목록에 가장 적합하다. sleep-tracker 앱에서는 매일 밤의 수면을 큰 아이콘의 격자 형식으로 표시할 수 있다. 이 디자인은 사용자에게 한눈에 수면 품질에 대한 overview를 제공한다
GridLayout이 항목을 배치하는 방법
GridLayout은 항목을 행과 열의 격자로 정렬한다. 세로 스크롤로 가정하면 기본적으로 행의 각 항목은 하나의 'span'을 차지한다. (이 경우 하나의 span은 하나의 column의 너비와 같다) 아래에 표시된 처음 두 예제에서 각 행은 세 개의 span으로 구성된다. 기본적으로 GirdLayoutManager는 지정한 span count까지 각각의 아이템을 하나의 span에 배치한다. span count에 도달하면 다음 줄로 줄 바꿈 된다.
기본적으로 각 항목은 하나의 span을 차지하지만 차지할 span의 수를 지정하여 항목을 더 넓게 만들 수 있다. 예를 들어 예제의 가장 오른쪽 화면의 맨 위 항목은 세 개의 span을 차지한다

span은 row 또는 column을 의미할 수 있다. GridLayoutManager를 사용하면 spanCount를 사용하여 그리드에 있는 열 또는 행의 수를 알 수 있고, 한 항목이 가로 또는 세로로 차지하는 grid 영역이 얼마나 되는지 알 수 있다
2. Implement GridLayout
이 단계에서는 RecyclerView를 가져와 GridLayoutManger를 사용하여 데이터를 표시하도록 업데이트 한다
Step 1: Change the LayoutManger
1) fragment_sleep_tracker.xml 레이아웃 파일을 연다
2) id가 sleep_list인 RecyclerView에서 layout manager를 제거한다.
// 지워야 할 코드
app:layoutManager="androidx.recyclerview.widget.LinearLayoutManager
3) SleepTrackerFragment.kt를 연다
4) onCreateView()에서 return문 바로 직전에 3개의 span을 가진 새로운 vertical GridLayoutManger를 만든다
- GridLayoutManger 생성자는 4개의 인자를 갖는다
- a context: activity
- number span: default가 vertical layout이므로 column을 의미
- orientation: default는 vertical
- reverse layout: reverse layout인지 아닌지 (기본값은 false)
val manager = GridLayoutManager(activity, 3, GridLayoutManager.VERTICAL, false)
5) 아래 줄에 RecyclerView가 GridLayoutManger를 사용하도록 코드를 추가한다. RecyclerView는 바인딩 객체에 있으며 sleepList라고 불린다 (fragment_sleep_tracker.xml 참고)
binding.sleepList.layoutManager = manager
Step 2: Change the layout
- list_item_sleep_night.xml의 현재 레이아웃은 하룻밤마다 전체 행을 사용하여 데이터를 표현하고 있다. 이번 단계에서는 grid layout을 사용하여 작은 사각형 항목으로 정의할 수 있다
- list_item_sleep_night.xml에서 했던 작업을 유지하기 위해 list_item_sleep_night_linear.xml에 코드를 복사한다
1) list_item_sleep_night.xml을 연다
2) 새로운 디자인에서는 필요가 없으므로 sleep_length TextView를 지운다.
3) quality_string TextView를 ImageView 아래에 보여주기 위해 옮긴다. quality_string TextView의 최종 레이아웃은 아래와 같다.
<ImageView
   android:id="@+id/quality_image"
   android:layout_width="@dimen/icon_size"
   android:layout_height="60dp"
   android:layout_marginTop="8dp"
   android:layout_marginBottom="8dp"
   app:layout_constraintBottom_toBottomOf="parent"
   app:layout_constraintEnd_toEndOf="parent"
   app:layout_constraintStart_toStartOf="parent"
   app:layout_constraintTop_toTopOf="parent"
   tools:srcCompat="@drawable/ic_sleep_5"
   app:sleepImage="@{sleep}"/>

<TextView
   android:id="@+id/quality_string"
   android:layout_width="0dp"
   android:layout_height="20dp"
   android:layout_marginEnd="16dp"
   android:textAlignment="center"
   app:layout_constraintBottom_toBottomOf="parent"
   app:layout_constraintEnd_toEndOf="parent"
   app:layout_constraintHorizontal_bias="0.0"
   app:layout_constraintStart_toStartOf="parent"
   app:layout_constraintTop_toBottomOf="@+id/quality_image"
   app:sleepQualityString="@{sleep}"
   tools:text="Excellent!"/>
4) 앱을 실행시켜서 sleep data가 그리드 형식으로 보여지는지 확인한다.
- ConstraintLayout은 여전히 전체 너비를 가지고 있는 것을 확인해라. GridLayoutManager는 span을 기준으로 뷰에 고정된 width를 제공한다. GridLayoutManager는 그리드를 배치하거나 공백을 추가하거나 항목을 clipping 할 때 모든 제약 조건을 충족하기 위해 최선을 다한다
5) SleepTrackerFragment의 GridLayoutManager에서 span의 수를 1로 변경하고 실행시킨다.
val manager = GridLayoutManager(activity, 1)'android > android kotlin fundamentals' 카테고리의 다른 글
| 07-5. Headers in RecyclerView (0) | 2021.07.03 |
|---|---|
| 07-4. Interacting with RecyclerView items (0) | 2021.07.02 |
| 07-2. DiffUtil and data binding with RecyclerView (1) | 2021.07.02 |
| 07-1. RecyclerView (0) | 2021.06.28 |
| 06-3. Use LiveData to control button states (0) | 2021.06.26 |


댓글